Keyban Auth
Overview
Keyban Auth is a secure and modular authentication layer designed to simplify the way users access non-custodial wallets. It enables integrators to offer custom login experiences while benefiting from high-security key management and seamless wallet orchestration.
Whether you need a branded login interface, integration with an existing SSO, or support for modern authentication flows like social login or OTP, Keyban Auth adapts to your needs with minimal integration effort.
Supported Authentication Methods
Keyban Auth supports four authentication methods, each configurable per organization:
Email OTP
Passwordless authentication via one-time code sent to email.
Phone OTP
Passwordless authentication via SMS one-time code.
OAuth 2.0 social login with Google accounts.
Auth0
Enterprise OAuth via Auth0 (configurable per organization).
| Method | Type | Flow | Configuration |
|---|---|---|---|
email-otp | Passwordless | Two steps (send then verify) | Enable/disable |
phone-otp | Passwordless | Two steps (send then verify) | Enable/disable |
google | Social OAuth | OAuth redirect | Enable/disable |
auth0 | Enterprise OAuth | OAuth redirect | Enable + domain, clientId, clientSecret |
Architecture
The authentication configuration flows from Admin Panel to Frontend SDK:
┌─────────────────────────────────────────────────────────┐
│                         Admin Panel                     │
│  ┌──────────────────────────────────────────────────┐   │
│  │ Authentication Settings                          │   │
│  │ [x] Email OTP   [x] Phone OTP                    │   │
│  │ [x] Google      [ ] Auth0 (domain, clientId...)  │   │
│  └──────────────────────────────────────────────────┘   │
└─────────────────────────────────────────────────────────┘
                              │
                              ▼ saves to
┌─────────────────────────────────────────────────────────┐
│                     Backend (NestJS)                    │
│  Organization.settings.authConfig                       │
│  { "email-otp": { enabled: true }, ... }                │
└─────────────────────────────────────────────────────────┘
                              │
                              ▼ fetched by
┌─────────────────────────────────────────────────────────┐
│                    Frontend (React SDK)                 │
│  const { config } = useKeybanAuth();                    │
│  config['email-otp'].enabled → true/false               │
│                                                         │
│  ┌──────────┐  ┌──────────┐                             │
│  │ Email    │  │ Phone    │  ← Dynamic tabs             │
│  │ OTP      │  │ OTP      │                             │
│  └──────────┘  └──────────┘                             │
│                                                         │
│  [Google] [Enterprise Login]  ← Social auth buttons     │
└─────────────────────────────────────────────────────────┘
Configuration flow:
- Administrator enables/disables authentication methods in Admin Panel
- Configuration is stored in
Organization.settings.authConfigon backend - Frontend SDK fetches config via
useKeybanAuth()hook - UI dynamically renders only enabled authentication methods
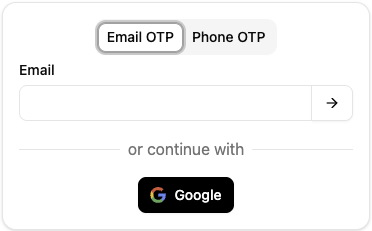
Example login form with Email OTP and Phone OTP tabs, plus Google social login
Getting Started
Prerequisites
Before implementing authentication, ensure you have:
- A Keyban organization account
- An application created in the Admin Panel
- The
@keyban/sdk-reactpackage installed
Admin Panel Configuration
Authentication methods are configured per organization in the Admin Panel:
- Navigate to Organization → Settings → Authentication
- Enable desired authentication methods using the toggles
- For Auth0, provide additional credentials:
- Domain: Your Auth0 tenant domain (e.g.,
your-tenant.auth0.com) - Client ID: Application client ID from Auth0 dashboard
- Client Secret: Application client secret from Auth0 dashboard
- Domain: Your Auth0 tenant domain (e.g.,
- Click Save
| Method | Required Fields |
|---|---|
| Email OTP | Enable toggle only |
| Phone OTP | Enable toggle only |
| Enable toggle only | |
| Auth0 | Enable toggle + Domain + Client ID + Client Secret |
SDK Setup
Wrap your application with the Keyban providers:
import { KeybanProvider, KeybanAuthProvider } from "@keyban/sdk-react";

function App() {
  return (
    <KeybanProvider appId="your-app-id" network="StarknetSepolia">
      <KeybanAuthProvider>
        <YourApp />
      </KeybanAuthProvider>
    </KeybanProvider>
  );
}
Your First Authentication
Basic Email OTP login in 4 steps:
import { KeybanInput, useKeybanAuth, AuthMethod } from "@keyban/sdk-react";
import { useState } from "react";

function Login() {
  const { sendOtp, signIn, config, isLoading } = useKeybanAuth();
  const [showOtp, setShowOtp] = useState(false);

  // 1. Check if method is enabled
  if (!config[AuthMethod.EmailOtp].enabled) {
    return <p>Email login not available</p>;
  }

  // 2. Handle send OTP
  const handleSendOtp = async () => {
    await sendOtp({ type: AuthMethod.EmailOtp, emailInputName: "email" });
    setShowOtp(true);
  };

  // 3. Handle verify OTP
  const handleVerify = () =>
    signIn({
      type: AuthMethod.EmailOtp,
      emailInputName: "email",
      otpInputName: "otp",
    });

  // 4. Render form with secure inputs
  return (
    <form onSubmit={(e) => e.preventDefault()}>
      <KeybanInput name="email" type="email" />
      {showOtp && <KeybanInput name="otp" inputMode="numeric" />}
      <button
        onClick={showOtp ? handleVerify : handleSendOtp}
        disabled={isLoading}
      >
        {showOtp ? "Verify Code" : "Send Code"}
      </button>
    </form>
  );
}
Core Operations
Passwordless Authentication
Email OTP
Two-step email OTP flow with loading and error states:
import { KeybanInput, useKeybanAuth } from "@keyban/sdk-react";
import { useState } from "react";

export default function EmailOTPLogin() {
  const [showOtp, setShowOtp] = useState(false);
  const { sendOtp, signIn, isLoading } = useKeybanAuth();
  const [error, setError] = useState<string | null>(null);

  const handleSendCode = async () => {
    setError(null);
    try {
      await sendOtp({
        type: "email-otp",
        emailInputName: "email",
      });
      setShowOtp(true);
    } catch (err) {
      setError("Failed to send OTP. Please check the email and try again.");
      console.error(err);
    }
  };

  const handleVerifyCode = async () => {
    setError(null);
    try {
      await signIn({
        type: "email-otp",
        emailInputName: "email",
        otpInputName: "otp",
      });
    } catch (err) {
      setError("Invalid OTP. Please try again.");
      console.error(err);
    }
  };

  return (
    <form onSubmit={(e) => e.preventDefault()}>
      {error && <div style={{ color: "red" }}>{error}</div>}

      {!showOtp ? (
        <div>
          <label>Email:</label>
          <KeybanInput name="email" type="email" />
        </div>
      ) : (
        <div>
          <label>Verification Code:</label>
          <KeybanInput
            name="otp"
            inputMode="numeric"
            inputStyles={{ textAlign: "center" }}
          />
        </div>
      )}

      <button
        type="button"
        onClick={showOtp ? handleVerifyCode : handleSendCode}
        disabled={isLoading}
      >
        {isLoading ? "Processing..." : showOtp ? "Verify Code" : "Send Code"}
      </button>
    </form>
  );
}
Phone OTP
Two-step phone OTP flow with country code selection:
import { KeybanInput, useKeybanAuth } from "@keyban/sdk-react";
import { useState } from "react";

export default function PhoneOTPLogin() {
  const [step, setStep] = useState<"phone" | "otp">("phone");
  const { sendOtp, signIn, isAuthenticated, isLoading } = useKeybanAuth();
  const [error, setError] = useState<string | null>(null);
  const [phoneCallingCode, setPhoneCallingCode] = useState("33");

  const handlePhoneSubmit = async () => {
    setError(null);
    try {
      await sendOtp({
        type: "phone-otp",
        phoneCallingCode,
        phoneInputName: "phone",
      });
      setStep("otp");
    } catch (err) {
      setError(
        "Failed to send OTP. Please check the phone number and try again."
      );
      console.error(err);
    }
  };

  const handleOtpSubmit = async () => {
    setError(null);
    try {
      await signIn({
        type: "phone-otp",
        phoneCallingCode,
        phoneInputName: "phone",
        otpInputName: "otp",
      });
    } catch (err) {
      setError("Invalid OTP. Please try again.");
      console.error(err);
    }
  };

  if (isAuthenticated) return <div>You're in!</div>;

  return (
    <form onSubmit={(e) => e.preventDefault()}>
      {error && <div style={{ color: "red" }}>{error}</div>}
      {step === "phone" ? (
        <div>
          <label>Phone Number:</label>
          <select
            value={phoneCallingCode}
            onChange={(e) => setPhoneCallingCode(e.target.value)}
          >
            <option value="33">+33 (France)</option>
            <option value="1">+1 (USA)</option>
            <option value="44">+44 (UK)</option>
          </select>
          <KeybanInput name="phone" type="tel" />
          <button
            type="button"
            onClick={handlePhoneSubmit}
            disabled={isLoading}
          >
            {isLoading ? "Sending..." : "Send Code"}
          </button>
        </div>
      ) : (
        <div>
          <label>Verification Code:</label>
          <KeybanInput
            name="otp"
            inputMode="numeric"
            inputStyles={{ textAlign: "center" }}
          />
          <button type="button" onClick={handleOtpSubmit} disabled={isLoading}>
            {isLoading ? "Verifying..." : "Verify"}
          </button>
        </div>
      )}
    </form>
  );
}
Social & Enterprise Authentication
Google OAuth
Initiate a social login flow with Google by calling signIn with the type google:
import { useKeybanAuth } from "@keyban/sdk-react";
import { useState } from "react";

export default function GoogleLogin() {
  const { signIn, isLoading, config } = useKeybanAuth();
  const [error, setError] = useState<string | null>(null);

  // Only render if Google is enabled
  if (!config["google"].enabled) return null;

  const handleGoogleLogin = async () => {
    setError(null);
    try {
      await signIn({ type: "google" });
    } catch (err) {
      setError("Failed to sign in with Google. Please try again.");
      console.error(err);
    }
  };

  return (
    <>
      {error && <div style={{ color: "red" }}>{error}</div>}
      <button type="button" onClick={handleGoogleLogin} disabled={isLoading}>
        {isLoading ? "Signing in..." : "Sign in with Google"}
      </button>
    </>
  );
}
Auth0 Enterprise
Auth0 enables enterprise SSO integration. The organization's logo and name are displayed on the login button:
import { useKeybanAuth, useKeybanApplication } from "@keyban/sdk-react";
import { useState } from "react";

export default function Auth0Login() {
  const { signIn, isLoading, config } = useKeybanAuth();
  const [app] = useKeybanApplication();
  const [error, setError] = useState<string | null>(null);

  // Only render if Auth0 is enabled for this organization
  if (!config["auth0"].enabled) return null;

  const handleAuth0Login = async () => {
    setError(null);
    try {
      await signIn({ type: "auth0" });
    } catch (err) {
      setError("Failed to sign in with Auth0. Please try again.");
      console.error(err);
    }
  };

  return (
    <>
      {error && <div style={{ color: "red" }}>{error}</div>}
      <button type="button" onClick={handleAuth0Login} disabled={isLoading}>
        {app.organization.logo && (
          <img
            src={app.organization.logo}
            alt={`${app.organization.name} logo`}
            style={{ width: 20, height: 20, marginRight: 8 }}
          />
        )}
        {isLoading ? "Signing in..." : `Sign in with ${app.organization.name}`}
      </button>
    </>
  );
}
Advanced Topics
Dynamic Authentication UI
Build adaptive login forms that render only enabled authentication methods:
import { useKeybanAuth, AuthMethod } from "@keyban/sdk-react";

function DynamicAuthForm() {
  const { config } = useKeybanAuth();

  // Determine which credential methods are enabled
  const credentialMethods = [
    AuthMethod.EmailOtp,
    AuthMethod.PhoneOtp,
  ].filter((method) => config[method].enabled);

  // Determine which social methods are enabled
  const socialMethods = [
    AuthMethod.Google,
    AuthMethod.Auth0,
  ].filter((method) => config[method].enabled);

  // Handle case where no methods are enabled
  if (credentialMethods.length === 0 && socialMethods.length === 0) {
    return <p>Authentication is not configured. Contact your administrator.</p>;
  }

  return (
    <div>
      {/* Credential-based methods as tabs */}
      {credentialMethods.length > 0 && (
        <div className="tabs">
          {credentialMethods.map((method) => (
            <button key={method} className="tab">
              {getMethodLabel(method)}
            </button>
          ))}
        </div>
      )}

      {/* Separator */}
      {credentialMethods.length > 0 && socialMethods.length > 0 && (
        <div className="separator">or continue with</div>
      )}

      {/* Social auth buttons */}
      {socialMethods.length > 0 && (
        <div className="social-auth">
          {socialMethods.map((method) => (
            <SocialButton key={method} method={method} />
          ))}
        </div>
      )}
    </div>
  );
}

function getMethodLabel(method: AuthMethod): string {
  const labels: Record<AuthMethod, string> = {
    [AuthMethod.EmailOtp]: "Email OTP",
    [AuthMethod.PhoneOtp]: "Phone OTP",
  };
  return labels[method] ?? method;
}
Framework Integrations
Material-UI Integration
import { KeybanInput, useKeybanAuth } from "@keyban/sdk-react";
import { TextField, Button, Box } from "@mui/material";
import { useState } from "react";

export default function MaterialUILogin() {
  const [showOtp, setShowOtp] = useState(false);
  const { sendOtp, signIn } = useKeybanAuth();

  const handleSendCode = async () => {
    await sendOtp({
      type: "email-otp",
      emailInputName: "email",
    });
    setShowOtp(true);
  };

  const handleVerifyCode = async () => {
    await signIn({
      type: "email-otp",
      emailInputName: "email",
      otpInputName: "otp",
    });
  };

  return (
    <Box sx={{ display: "flex", flexDirection: "column", gap: 2 }}>
      <TextField
        label="Email"
        variant="outlined"
        fullWidth
        slots={{
          htmlInput: () => (
            <Box
              component={KeybanInput}
              name="email"
              type="email"
              sx={{ flexGrow: 1 }}
            />
          ),
        }}
      />

      {showOtp && (
        <TextField
          label="Verification Code"
          variant="outlined"
          fullWidth
          slots={{
            htmlInput: () => (
              <Box
                component={KeybanInput}
                name="otp"
                inputMode="numeric"
                inputStyles={{ textAlign: "center" }}
                sx={{ flexGrow: 1 }}
              />
            ),
          }}
        />
      )}

      <Button
        variant="contained"
        onClick={showOtp ? handleVerifyCode : handleSendCode}
      >
        {showOtp ? "Verify Code" : "Continue with Email"}
      </Button>
    </Box>
  );
}
International Phone Number Input
import { KeybanInput, useKeybanAuth } from "@keyban/sdk-react";
import { MuiTelInput } from "mui-tel-input";
import { useState } from "react";
import { Box } from "@mui/material";

const PhoneInput = () => (
  <Box
    component={KeybanInput}
    type="tel"
    name="phone"
    sx={{ flexGrow: 1, p: 2, pl: 0 }}
  />
);

export default function PhoneLogin() {
  const [phoneCallingCode, setPhoneCallingCode] = useState("33");
  const [showOtp, setShowOtp] = useState(false);
  const { sendOtp, signIn } = useKeybanAuth();

  const handleSendCode = async () => {
    await sendOtp({
      type: "phone-otp",
      phoneCallingCode,
      phoneInputName: "phone",
    });
    setShowOtp(true);
  };

  const handleVerifyCode = async () => {
    await signIn({
      type: "phone-otp",
      phoneCallingCode,
      phoneInputName: "phone",
      otpInputName: "otp",
    });
  };

  return (
    <div>
      <MuiTelInput
        name="phone"
        defaultCountry="FR"
        value={`+${phoneCallingCode}`}
        forceCallingCode
        onChange={(_, infos) =>
          setPhoneCallingCode(infos.countryCallingCode ?? "")
        }
        fullWidth
        slots={{ htmlInput: PhoneInput }}
      />

      {showOtp && (
        <KeybanInput
          name="otp"
          inputMode="numeric"
          inputStyles={{ textAlign: "center" }}
        />
      )}

      <button onClick={showOtp ? handleVerifyCode : handleSendCode}>
        {showOtp ? "Verify" : "Continue"}
      </button>
    </div>
  );
}
Secure Input Component
The KeybanInput component is a secure, iframe-based input designed specifically for handling sensitive authentication data.
Key Security Features
- Iframe Isolation: All inputs are rendered in sandboxed iframes to prevent data leakage
- Cross-Origin Protection: Secure communication between iframe and parent application
- No Direct Access: Input values are never accessible from the parent application context
Focus Management
import { KeybanInput, KeybanInputRef } from "@keyban/sdk-react";
import { useRef } from "react";

export default function FocusExample() {
  const emailRef = useRef<KeybanInputRef>(null);
  const passwordRef = useRef<KeybanInputRef>(null);

  const focusEmail = () => emailRef.current?.focus();
  const focusPassword = () => passwordRef.current?.focus();

  return (
    <div>
      <KeybanInput ref={emailRef} name="email" type="email" />
      <KeybanInput ref={passwordRef} name="password" type="password" />

      <button onClick={focusEmail}>Focus Email</button>
      <button onClick={focusPassword}>Focus Password</button>
    </div>
  );
}
Custom Styling
import { KeybanInput } from "@keyban/sdk-react";

export default function StyledInputs() {
  return (
    <div>
      {/* OTP input with centered text */}
      <KeybanInput
        name="otp"
        inputMode="numeric"
        inputStyles={{
          textAlign: "center",
          fontSize: "24px",
          backgroundColor: "#f5f5f5",
          color: "#333",
        }}
        style={{
          border: "2px solid #007bff",
          borderRadius: "8px",
          padding: "12px",
        }}
      />

      {/* Email input with custom appearance */}
      <KeybanInput
        name="email"
        type="email"
        inputStyles={{
          fontSize: "16px",
          color: "#2c3e50",
        }}
        className="custom-input-class"
      />
    </div>
  );
}
User Management
User Sign-Out
Log out a user by calling the signOut function:
import { useKeybanAuth } from "@keyban/sdk-react";

export default function UserProfile() {
  const { user, signOut } = useKeybanAuth();

  if (!user) return null;

  return (
    <div>
      <p>Welcome, {user.email}!</p>
      <button onClick={() => signOut()}>Sign Out</button>
    </div>
  );
}
Updating User Information
Update a user's metadata with the updateUser function:
import { useKeybanAuth } from "@keyban/sdk-react";
import { useState } from "react";

export default function UpdateProfile() {
  const { user, updateUser, isLoading } = useKeybanAuth();
  const [error, setError] = useState<string | null>(null);
  const [success, setSuccess] = useState<string | null>(null);

  const handleUpdate = async () => {
    setError(null);
    setSuccess(null);
    if (user) {
      try {
        await updateUser({
          name: "New Name",
        });
        setSuccess("Profile updated successfully!");
      } catch (err) {
        setError("Failed to update profile. Please try again.");
        console.error(err);
      }
    }
  };

  return (
    <div>
      {error && <div style={{ color: "red" }}>{error}</div>}
      {success && <div style={{ color: "green" }}>{success}</div>}
      <p>Current Name: {user?.name || "Not set"}</p>
      <button type="button" onClick={handleUpdate} disabled={isLoading}>
        {isLoading ? "Updating..." : "Update Name"}
      </button>
    </div>
  );
}
API Reference
For complete type definitions and function signatures, see the React SDK Reference.
Hooks
| Hook | Description | Returns |
|---|---|---|
useKeybanAuth | Authentication state and methods | AuthContext |
useKeybanApplication | Application and organization data | [Application, Error] |
useKeybanAuth Return Values
| Property | Type | Description |
|---|---|---|
user | AuthUser | null | undefined | Current user (undefined = loading, null = not authenticated) |
isAuthenticated | boolean | undefined | Authentication state |
isLoading | boolean | True during auth operations |
config | AuthConfig | Enabled auth methods for the organization |
sendOtp | (args) => Promise<void> | Send OTP code (email or phone) |
signIn | (args) => Promise<AuthUser> | Sign in user |
signOut | () => Promise<void> | Sign out current user |
updateUser | (args) => Promise<AuthUser> | Update user data |
AuthMethod Values
| Value | Description |
|---|---|
email-otp | Email one-time password |
phone-otp | Phone SMS one-time password |
google | Google OAuth 2.0 |
auth0 | Auth0 OAuth 2.0 |
signIn Arguments by Type
| Type | Required Arguments | Optional Arguments |
|---|---|---|
email-otp | emailInputName, otpInputName | - |
phone-otp | phoneInputName, otpInputName, phoneCallingCode | - |
google | None | - |
auth0 | None | - |
sendOtp Arguments by Type
| Type | Required Arguments |
|---|---|
email-otp | emailInputName |
phone-otp | phoneInputName, phoneCallingCode |
KeybanInput Component
For complete props documentation, see
KeybanInputin the SDK Reference.
| Prop | Type | Description |
|---|---|---|
name | string | Input identifier used in auth functions |
type | "email" | "password" | "tel" | Input type for validation and keyboard |
inputMode | "numeric" | "email" | "tel" | Virtual keyboard type |
inputStyles | object | Styles applied inside the iframe |
style | CSSProperties | Styles applied to the iframe container |
className | string | CSS class for the iframe container |
ref | Ref<KeybanInputRef> | Ref for focus management |
Best Practices
-
Always use
KeybanInputfor sensitive data: Never use regular HTML inputs for passwords, OTP codes, or other sensitive information to ensure that sensitive data is handled securely within an iframe. -
Proper naming: Use descriptive and consistent names for your inputs that match your authentication flow (e.g., "email", "phone", "otp"). These names are used to reference the inputs in the
useKeybanAuthfunctions. -
Use correct input types: Always specify the appropriate
typefor yourKeybanInputcomponents (e.g.,email,tel,password) to provide the best user experience on different devices (e.g., showing the correct keyboard). -
Implement robust error handling: Authentication can fail for many reasons (e.g., invalid credentials, network issues). Always wrap your authentication calls in a
try...catchblock and provide clear feedback to the user.const [error, setError] = useState<string | null>(null);
const handleLogin = async () => {
setError(null);
try {
await signIn({ type: AuthMethod.EmailOtp, ... });
} catch (err) {
setError("Authentication failed. Please try again.");
console.error(err);
}
}; -
Provide loading state feedback: Authentication requests are asynchronous. Use the
isLoadingstate fromuseKeybanAuthto give users visual feedback, such as disabling buttons or showing a spinner.const { signIn, isLoading } = useKeybanAuth();
<button onClick={handleLogin} disabled={isLoading}>
{isLoading ? "Logging in..." : "Login"}
</button>; -
Ensure accessibility:
- Always associate a
<label>with yourKeybanInputcomponents, even if the label is visually hidden. - Ensure that your forms are keyboard-navigable.
- Use semantic HTML (
<form>,<button>, etc.) to improve accessibility.
- Always associate a
-
Check method availability before rendering: Always verify a method is enabled before showing its UI.
const { config } = useKeybanAuth();

// Good: Check before rendering
{
  config["google"].enabled && <GoogleLoginButton />;
}

// Bad: May fail if method is not enabled
<GoogleLoginButton />; -
Handle organization-specific branding for Auth0: When using Auth0, display the organization's logo and name for a branded experience.
const [app] = useKeybanApplication();

<button onClick={() => signIn({ type: "auth0" })}>
  {app.organization.logo && (
    <img src={app.organization.logo} alt={`${app.organization.name} logo`} />
  )}
  Sign in with {app.organization.name}
</button>; -
Graceful degradation when no auth configured: Handle the edge case where no authentication methods are enabled.
const hasAnyMethod = Object.values(config).some((c) => c.enabled);
if (!hasAnyMethod) {
  return <p>Authentication not configured. Contact your administrator.</p>;
}